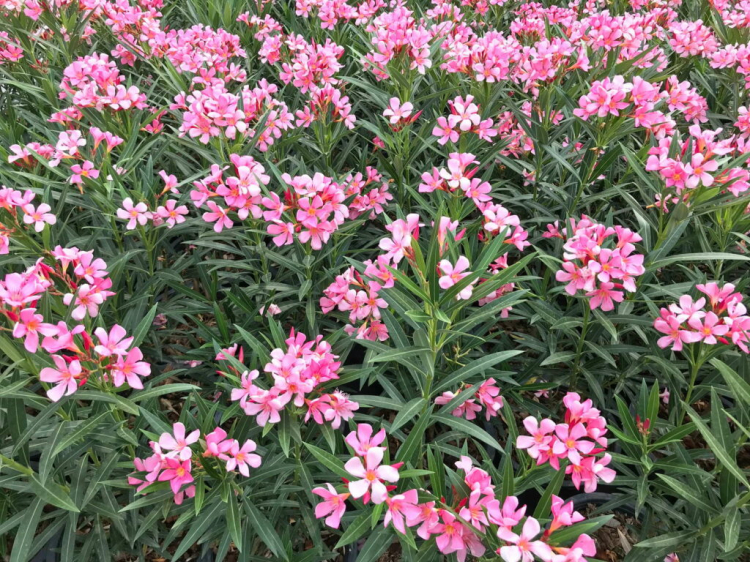
Oleander Propagation By Seeds And Cuttings
There are several ways to propagate your oleander in the garden. We show how propagation via seeds, offshoots. The plant can either be propagated via seeds or cuttings, root division, and even grafting. We have put together the most important information about the propagation of the plant for you here. Anyone who already owns oleander will quickly feel the need for more. Why not, when breeding is so easy?
Propagate oleanders by seeds
Table of Contents
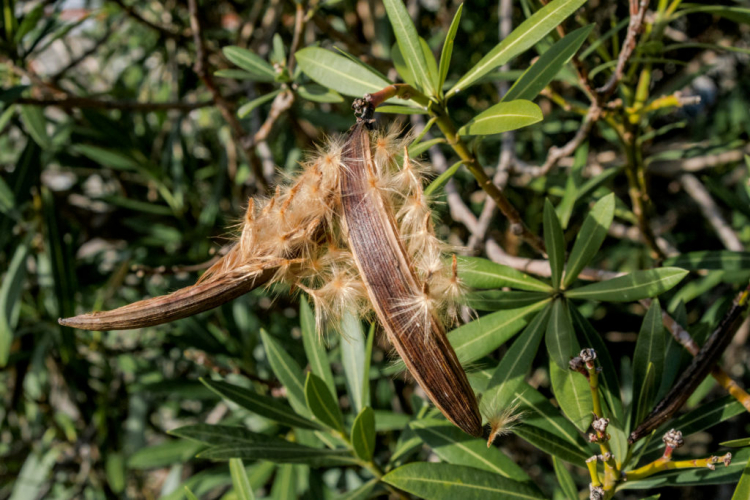
After flowering, brown follicles form, in which seeds similar to those of dandelions ripen. These seeds can of course be used for propagation and are particularly important as a base for later refinement. But propagation can also be exciting for the sake of the seedlings. However, many oleanders are hybrids, which means that they are a cross of two different varieties and therefore not varietal.
Seedlings of these hybrids are therefore often very different from one another and the mother plant. Even with genuine oleander varieties, the young plants can look different if they have been crossed out by pollen from another oleander plant. So let yourself be surprised. However, the young plants do not start to flower until the third year.
Before sowing, soak the seeds in lukewarm water for a few hours to soak before spreading them in a flowerpot on a rather nutrient-poor substrate such as coconut soil. Organic herb and sowing soil are also ideally suited for this purpose – it offers your oleander optimal starting conditions. Cover the seeds with some soil and place the bowl in a light and warm place. The soil should be kept moist. A nursery or cling film that you stretch over the edge of the pot is helpful here. It can take a few weeks for the seeds to germinate. The best time to grow seeds is in early spring, but basically all year round.
Summary of how to propagate oleanders from seeds:
- Let the seeds pre-soak
- Place on a nutrient-poor substrate and cover with a little soil
- Keep it moist and warm at all times
- Wait a few weeks
You might so like: The Haricot (Green) Bean: Cultivation Of French Bean
Propagate oleanders by cuttings
Propagating oleanders from cuttings is pretty easy. Use the remnants left over from the pruning. It is not important whether the branches are woody or fresh young shoots, they should only be about a foot long and have no buds. Remove the leaves from the lower part of the cuttings and put them in a water glass in a warm place.
You May Also Like Fertilize Oleander
To prevent algae formation and improve rooting results, you can wrap the glass with aluminum foil or another opaque material. You will see that after about four weeks your cuttings will have enough roots for you to plant. Alternatively, you can put the cuttings directly into a pot of soil. For quick rooting, it is an advantage if you use green cuttings from the growing season, i.e. between May and August.
You might so like: Fertilizing Basil: Which Fertilizer Is The Right One?
Summary Oleander propagation by cuttings:
- Especially possible during the growing season between May and August
- Cut 20 to 30 cm long branches without buds (for example when pruning annually)
- Remove the leaves from the lower part of the branch
- Put the branch in a water glass or stick it directly into the ground
- Put the cutting in a warm place and water it sufficiently
Propagate oleanders by dividing them
Large oleanders can also be divided if the growth habit allows this. To do this, take the plant out of the bucket and carefully divide the root ball so that both parts have enough shoots left. You should cut back some shoots so that the two oleander parts can first put their strength into the roots and do not have too much leaf mass to take care of. Then pot both parts in sufficiently large pots. The two halves of the oleander will have recovered within a short time and will do everything possible to regain their original size as quickly as possible.
In summary, multiplying oleanders by dividing them:
- Use older oleander plants with a sufficient number of shoots
- Divide the root ball so that both halves still have enough shoots
- Shorten some shoots
- Put both parts in a sufficiently large saucepan
Propagate oleanders through grafting
If your oleander tends to have problems with root pests, or if your favorite oleander variety is rather slow-growing, you can also refine it. As a base, you need an offshoot of a robust and well-growing oleander variety. It is best to grow a young plant from seeds. When this is thick enough, cut an equally thick noble rice from the desired oleander, which you can then graft onto the base. The best time is in spring just before the start of the growing season. Very clean cuts are particularly important for the finishing to work. So before the action, clean your knife thoroughly to prevent contamination and do not touch the interfaces.
Both the base and the noble rice are now – for this technique known as copulation – cut with an oblique cut and placed on top of one another. For those who are more advanced in terms of finishing, other cutting techniques are of course also possible. Whichever technique you choose, it is definitely of great importance that the cut is straight and neat. Now wrap the interface with tree bast and create the best atmosphere for the freshly grafted oleander.
It will be a while before you can admire your result. However, refining has to be learned. If it doesn’t work the first time, don’t give up hope and just try again.
Summary of growing oleanders through grafting:
- If your favorite oleander is not growing well, grafting is a good option for propagation
- The best time is in spring
- Be sure to use a clean and sharp knife
- Choose a sturdy young plant grown from seeds as a base
- Cut noble rice that is as thick as the base
- Both the base and the noble rice are cut with a long slope and placed on top of each other
- Wrap the interface with tree bast
- Just wait and see
You Might Also Like Best Water for Indoor Plants