How To Repot Cactus: Video Instructions And Care Tips
Even if the plants are very robust, they need a little attention now and then. We show in the video how to properly repot cacti.
Cacti ( Cactaceae ) are considered to be the house plants par excellence and can be found in almost every apartment. No wonder, after all, the exotic guests have all sorts of advantages to offer. Especially their robust nature and the fact that the plant can cope with a bit of neglect over a long period of time make it a popular, easy-care houseplant that is appreciated by beginners as well as by gardening professionals.
But their appearance also makes the cacti so popular, because their spherical and prickly growth has meanwhile achieved cult status. Now and then, however, you should do something good for the robust houseplants – for example by repotting them. In this video, we reveal how this works and what you have to pay attention to.
With their frugal nature and their high robustness, cacti are ideal plants for anyone who does not have a pronounced green thumb. Now and then, however, the easy-care houseplants also need attention and should be repotted – this is the only way to keep them beautiful for years.
When and how often do you have to repot cacti?
Table of Contents
In fact, cacti (depending on the species) only need to be repotted every two to five years. The perfect time for this is from late January to March when the new growing season for the cacti begins. But even after flowering into September, the cacti can be repotted without any problems.
The plant clearly shows whether it is time for a new pot: If it is too big for its old pot and grows over the edge or is looking for new paths through the holes in the pot with its roots, it is time for a change of scenery. The soil also provides information about whether the cactus needs to be repotted again – if it is compacted or depleted, you should think about a new container.
You should also buy freshly bought cacti in their new home in a new pot. There are several reasons for this: On the one hand, it is difficult to estimate how old the earth is with which the cactus was acquired. On the other hand, one repeatedly encounters inferior substrate or pests that can damage the cactus in the long term. To give the new houseplant the best possible start in its life, it is, therefore, advisable to repot it after purchase.
This is how you repot cacti
Repotting cacti can be a prickly business if you don’t know how to do it. But for the prickly houseplants to thrive well even after years, such a change of scenery is inevitable – we will tell you the best way to go about it.
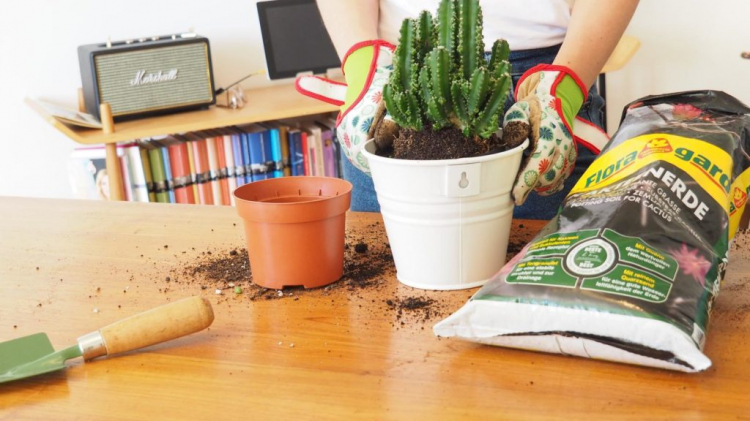
That’s what you need
It doesn’t take much to replant cacti – in fact, most items can be found in every household. You need:
- cactus
- Bigger pot
- Inner pot with holes
- Planting clay
- Cactus soil
- shovel
- Gloves
The right soil for cacti
Although cacti are considered particularly robust, they are rather petty when it comes to choosing their soil. In fact, they can rarely be cultivated well in normal potting soil – this seldom meets the requirements of exotic houseplants and, thanks to its high nutrient concentration, ensures a fattening growth. You should pay particular attention to the structure of the earth: only well-ventilated and crumbly substrates allow the cactus to develop its roots and absorb enough nutrients and water.
You might so like: Angel’s Trumpet Plant: Overwintering, Multiplying, And Cutting Of Brugmansia
At the same time, the soil must also be structurally stable and provide the plant with sufficient support so that it does not tip over. In addition, the earth should be able to absorb and store water, even if it was completely dried out. Finally, the buffering capacity and the pH value are also important for the optimal growth of the cacti – most species prefer slightly acidic soil.
To meet all of these requirements, it is worth using special cactus soils from specialist retailers. These are usually particularly well geared towards the needs of indoor plants and also have a particularly good concentration of nutrients, which is well accepted by almost all types of cacti. You can also mix cactus soil yourself. This offers the great advantage that the substrate can be adapted exactly to the needs of a certain species and thus individually tailored to the individual cacti.
The perfect vessel for cacti
Clay or plastic pot? With cacti, this question can unfortunately not only be decided by personal taste, because the different pot materials can have a strong impact on the cultivation of the plant. Plastic pots have the great advantage that water is distributed particularly evenly in them and excess moisture can escape through the drainage holes in the base so that there is no waterlogging.
Clay, on the other hand, is breathable, but also absorbs water and allows it to evaporate through its pores. This phenomenon can be of advantage for particularly moisture-sensitive species, but it also means that cacti in the clay pot have to be watered significantly more often. If you also use a planter, you should make sure that no excess water accumulates – otherwise, there is a risk of root rot.
But not only the material but also the size and shape of the pot are important with cacti: column-shaped cacti should be given a heavy, stable pot if possible to prevent them from tipping over. As a rule of thumb, one can assume that the diameter of the pot should be about a third of the height of the plant. Spherical cacti do not need such a firm stand, but there should be at least a finger’s width between the plant and the edge of the pot to leave the plant enough space for growth. Shallow-rooted species such as agaves ( agave ) are better off in a planting bowl, as the soil dries faster here – cacti with beetroots – such as the schnapps head ( Lophophora williamsii ) – need a particularly narrow and deep pot.
Procedure for repotting cacti
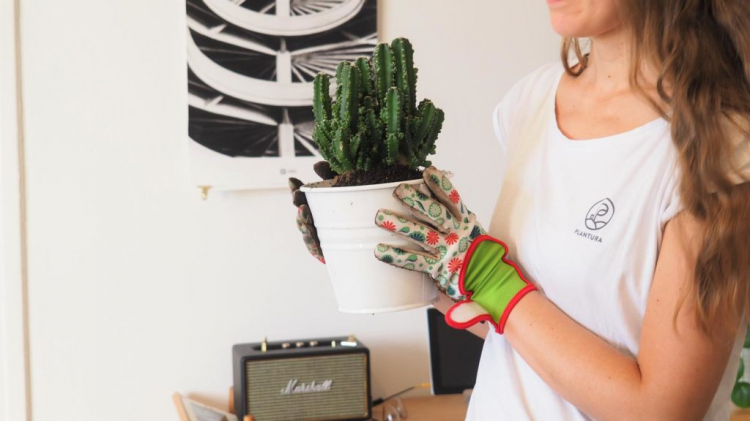
Even if cacti usually don’t get a lot of attention, it’s important to devote a little time to them every few years and to repot them in a larger container. Before you start working, however, you should ensure that you wear suitable protective clothing: Thorn-proof gloves made of leather or rubber protect your hands from the sharp spikes and prevent painful stings that can easily catch fire when working with the cactus soil. In the case of cactus species with particularly long or pointed thorns, it is also advisable to work with pliers or grip protection made of paper or styrofoam to minimize the risk of injury.
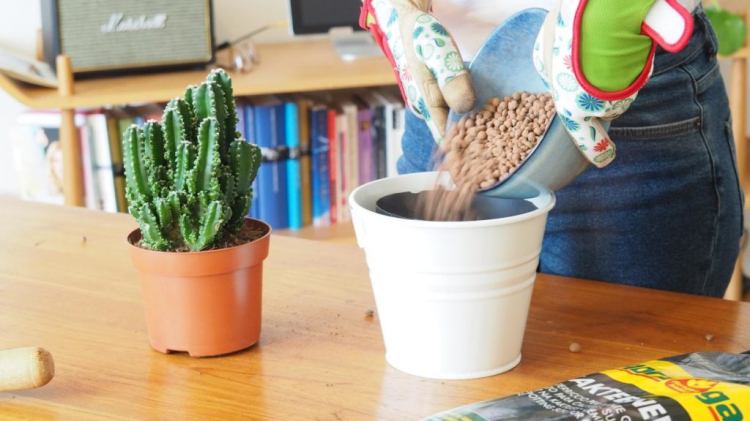
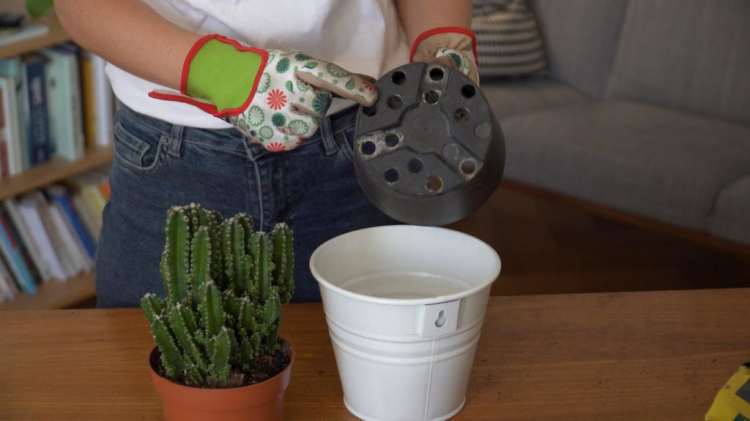
Now you can prepare the new pot: Ideally, you work with an inner pot with drainage holes, because this can prevent waterlogging. This drainage effect is supported by planting clay, with which you fill a little less than a quarter of the pot. In addition to its structural effect, the plant clay has the additional advantage that it binds water particularly well and can release it back into the surrounding soil if necessary. Now you can fill the inner pot with some cactus soil.
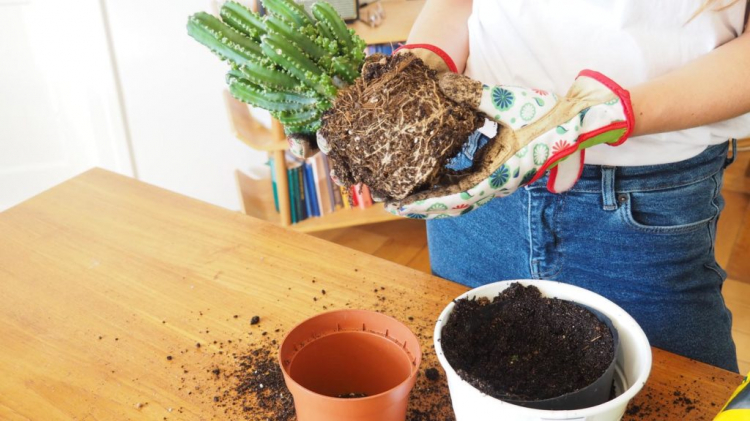
Now you should begin to carefully detach the cactus from its old pot and remove the soil. Particular sensitivity is required here, as none of the fine roots of the cactus should be damaged if possible. The soil loosens particularly well if you don’t water the cactus about a week before repotting – the dried-out soil loosens much more easily from the fine root tissue. Then you can put the cactus in its new pot. You should not press the plant with force, but put it on a few times – this promotes a good connection between the cacti and the new substrate without compacting the soil too much.
You might so like: Marjoram: How To Grow Spicy Aroma In The Garden
Once the plant is in place, the substrate is loosely filled around the plant. Make sure that the cactus is just as deep in the ground as in its old pot. Otherwise, the cacti in particular will begin to rot at the root neck. Finally, you only have to carefully press the earth around the cactus before it can be returned to its original place.
Summary – repotting cacti:
- 1. Put on thorn-proof gloves
- 2. Fill the inner pot a little less than a quarter with planting clay
- 3. Fill the cactus soil in the inner pot
- 4. Carefully remove the cactus from the old pot
- 5. Carefully remove the old soil from the root ball
- 6. Place the cactus in the new pot and press gently
- 7. Fill the pot with cactus soil
- 8. Gently press the earth
Care for the cactus after repotting
Repotting is a lot of stress even for a robust plant like the cactus. For this reason, it is particularly important to give it proper care after transplanting. However, unlike many other plants, you shouldn’t give cacti a large amount of water after repotting – in fact, it is ideal not to water at all for about a week after repotting so that the plant can get used to its new home. In addition, you should avoid locations with direct sunlight (especially with scorching midday sun) for the first three to four weeks. Only when a good new root has taken place are the plants able to deal with extreme heat and solar radiation again.
The perfect location for cacti
Originally, cacti mostly come from particularly dry regions with high solar radiation in America. Their demands on a location in the apartment are accordingly: Bright rooms with lots of light are ideal for the prickly exotic species. The cacti also do not mind dry heating air – but the indoor plants cannot tolerate high humidity, such as that found in the bathroom.
The fact that cacti like it particularly hot, on the other hand, is just a widespread misconception. In fact, many of them get by with mild temperatures and some cactus species are even so hardy that they are not only suitable as indoor plants, but also for free-range husbandry. Cacti not only need attention when repotting.